2. Configure Raspbian
All commands should be executed from the /home/pi folder, unless the guide says otherwise. Be aware linux is case-sensitive, make sure every command is typed accurately, one wrong character will make things not work properly or at all ! 1
To see the current folder you are in, type pwd
To return to /home/pi from any other folder, type cd and press enter
Whenever you are in the home folder the prompt will appear as pi@raspberry:~$
Change your password
When logged in as the pi user, you should change the default password as security measure to prevent anyone you don't want accessing the device. Changing your password is simple with this instruction following my example:
pi@raspberry:~$ passwd
Changing password for pi.
(current) UNIX password:
Enter new UNIX password:
Retype new UNIX password:
passwd: password updated successfully
pi@raspberry:~$
**Note: Characters will not be visible when typing passwords, be sure you enter them correctly ! Otherwise you'll lock yourself out of the pi
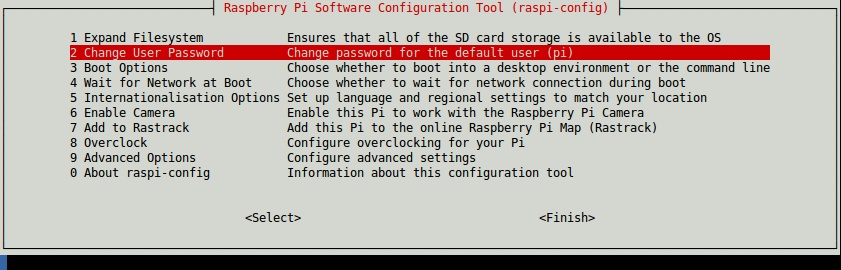
Change Password from Raspi-config menu on Jessie Pixel
Update Raspberry Pi System (This is critical!) :
Do: sudo apt-get update; sudo apt-get upgrade -y in order to update Raspbian's system before proceeding. This will take a while (20-30 minutes). Make sure to reboot after the updates!
Set locale
You need to set the locale (Language/Region settings) of Raspbian in order to run the Stratis.
Step 1) Reconfigure language/region settings
pi@raspberry:~$ sudo dpkg-reconfigure locales
Choose your desired language from the list by pressing spacebar ( en_US.UTF-8 is the preferred choice), then choose ok. On the second dialogue select none
Step 2) Update System-Wide Envrionment Language
Next you will need to set the system environment locale which affects all users, by doing the following at the prompt (change accordingly to suit your language choice from the previous step:
pi@raspberry:~$ sudo sh -c "echo 'LC_ALL=en_US.UTF-8\nLANG=en_US.UTF-8' >> /etc/environment"
Confirm the setting with:
pi@raspberry:~$ cat /etc/environment
Update the locale:
sudo update-locale
Now restart: sudo reboot
Connect to the network
Ethernet
Just connect your Raspberry Pi directly (Lan cable) to your router and you should be good to go.
You can verify if it has successfully connected typing at prompt: ifconfig eth0. If the inet addr field shows your network ip, the Pi has connected to the network. If not, try rebooting by typing sudo reboot.
Wifi
You need a Raspberry Pi 3 for this step. Older models does not have built in wifi.
It is recommended to use an ethernet cable while staking, but wireless should also work fine. You can skip this step if you use an ethernet cable.
Open the wpa-supplicant configuration file in nano:
sudo nano /etc/wpa_supplicant/wpa_supplicant.conf
Go to the bottom of the file and add the following:
network={
    ssid="wireless_network_name"
    psk="wireless_network_password"
}
When connecting to a network called "my_wifi" with password "qwerty", you would enter:
network={
    ssid="my_wifi"
    psk="qwerty"
}
Now save the file by pressing Ctrl+X then Y, and press Enter.
Reboot your Raspberry Pi with sudo reboot.
You can verify if it has successfully connected using ifconfig wlan0. If the inet addr field has an address beside it, the Pi has connected to the network. If not, check that your password and network name are correct. Also check that the syntax in the configuration file exactly matches the syntax above.
Check Your Network Connection is Online
Run ping -c 5 google.com. The result should look something like this:
64 bytes from arn09s11-in-f174.1e100.net (172.217.22.174): icmp_seq=1 ttl=56 time=1.69 ms
64 bytes from arn09s11-in-f174.1e100.net (172.217.22.174): icmp_seq=2 ttl=56 time=1.34 ms
64 bytes from arn09s11-in-f174.1e100.net (172.217.22.174): icmp_seq=3 ttl=56 time=1.38 ms
64 bytes from arn09s11-in-f174.1e100.net (172.217.22.174): icmp_seq=4 ttl=56 time=1.36 ms
64 bytes from arn09s11-in-f174.1e100.net (172.217.22.174): icmp_seq=5 ttl=56 time=1.40 ms

--- google.com ping statistics ---
5 packets transmitted, 5 received, 0% packet loss, time 4006ms
rtt min/avg/max/mdev = 1.346/1.438/1.697/0.130 ms
If it doesn't say 5 packets transmitted, 5 received, make sure you have connected the ethernet cable or have connected to wifi (see previous chapter).
**Note: There's known issue with Raspberry pi tending to drop its Wifi Connection, follow this guide as a remedy to make sure you're always connected to the network.